

Our group turned to Paper Miniatures and in all honesty? We prefer them.
Pros and Cons of Paper Miniatures:
Pros:
I will also share our process for making them. Peace!
Pros and Cons of Paper Miniatures:
Pros:
- You can use any image you want, including something you've drawn yourself, or I can search for images that fit the storyline.
- You can create multiple images of each character.
- You can add character names or minion numbers to the bottom. "I attack Goblin 4" instead of "I attack that Goblin. Which one is he again? Isn't he 6? No he's the left one.
Cons:
- They're not as sturdy as normal miniatures, even with card. Susceptible to bending.
- Sometimes the paper peels away from the card - can easily be touched up in game.
I will also share our process for making them. Peace!
Step One: Acquire Starter Pack and Templates
Head on over to http://www.darkcitygames.com/
They have a few packs of monsters to get you started, all of a high quality. To make the custom miniatures though, we'll be looting their template to give us good size options.
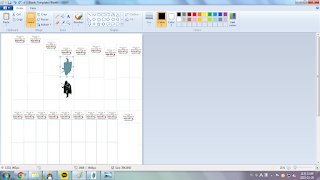
Step Two: Empty a Template
Using the template sizes as a... Template... Clean them out. (or alternatively, save the one below :D)
Step Three: Make or Search For The Creatures You Need And Insert Them To Template
A Google images search using terms like "Fantasy Elf" or "D&D Orc" etc will bring up what you like. Ideally you want something with a white background.
If you take Images from deviantart or other sharing websites, please try to drop by the Artist's page and like/share/comment.
You can use Paint to crop/resize them.


Simply invert the image and copy above.
[OPTIONAL] Step Four: Add Shadows
In our games we like to keep track of the direction the character is facing. This way we can use it when determining Passive Perception scores or similar. To achieve this, we place a shadow on the backside of the miniature by:
Copy the Resized Image into GIMP. (Free to Download)

Use the 'Select by Colour' tool and click on the White Space in the picture.
Click Invert.

Fill the Selection using the Fill Tool with the Shadow Colour of your choice. Some pieces may not fill - you can touch it up with a brush.


Flip the Image.

You can add a blur if you wish. I add a 1pt Blur just to make it less pixel-heavy.
Select All, Copy, And Paste back in the Paint Template.

Repeat until you have the desired number of images and print.
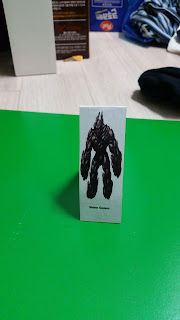
Step 5: Stick to Card
To give the tokens some durability, I stick them to card.
Slay safe!
Merke


Yeah you could find a bunch of art to use, or even grab some made paper minies. There are few artists that make them at Patreon. Just google Paper Forge, PrintableHeroes, Paper Mage or Miniature Villains. They all have free paper miniatures.
ReplyDelete